How I use sample cards

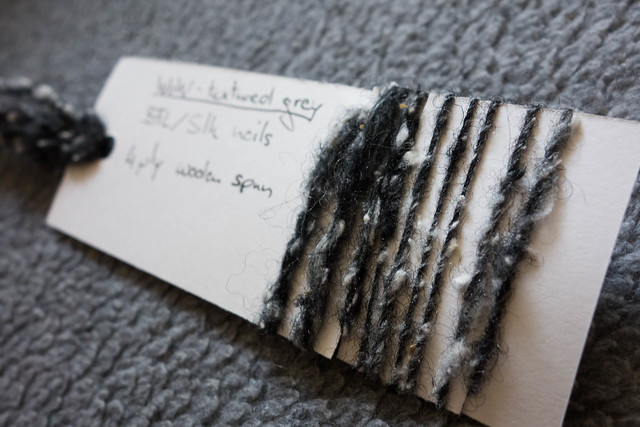
Sample cards are a way to record how you spun a certain yarn. It can help to spin consistently during a bigger project, keep a record of different spinning projects, measure improvement in your spinning technique and so on. Some people use them for every project, some never use them. I think they are a useful tool to spin a consistent yarn and help you in spinning thinner or thicker than you usually feel comfortable.

Sample Cards

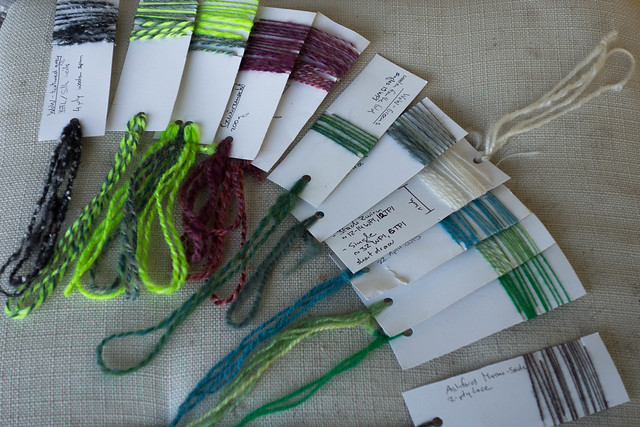
Sample cards I used in various spinning projects

I personally use sample cards if I have a spinning project where I have a certain yarn or knitted/woven project in mind and want to ensure that the resulting yarn is what I wanted. I also like them for an easy way to spin an even yarn, especially if the intended thickness of the singles is  thicker than I usually spin.

Sample Cards

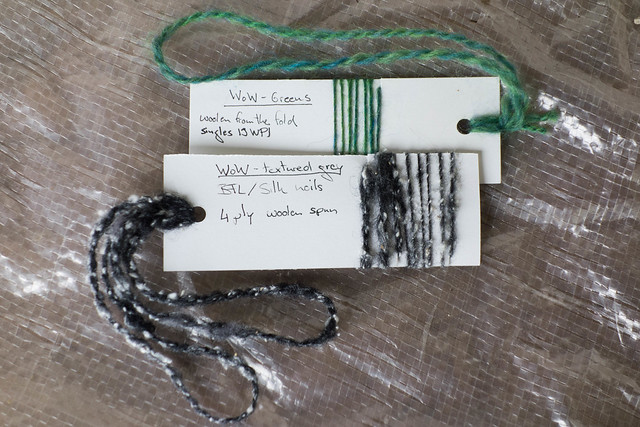
The top one is for a yarn slightly thicker than I usually spin.
The bottom one is for a lace yarn

I use plain cardboard for my sample cards; I have DIN A5 cardstock which I cut into four strips before punching a hole in one end and making a few cuts to secure the ends. At the beginning of a new project, I spin a few lengths of singles. I either make an extended sample, i. e. spin, ply and wash the yarn and knitting a swatch before recording the yarn with a sample card. If I am confident I know that the singles will give me the yarn I want, I might make a sample card immediately.

Sample Cards

Those are sample cards for bigger projects.
In addition to the cards, I knitted swatches to decide if I like the fabric.

I usually wind a singles around the card, as well as a ply back (that is, letting a freshly spun singles ply back at itself). I use the hole to hang a bit of yarn from it. Ideally that is the yarn how I want it to look after plying, before it is finished. Often, it is just another ply back. More often than I than not, only write down the fiber I’m using, and sometimes I change my mind what yarn to spin because of the sample but don’t make a new one. This applies mostly to plying, because I can still use the card to reference the singles. If I decide to spin the singles in a different way, I would either have to make a new sampling card or to not use one as a reference.

Sample Cards

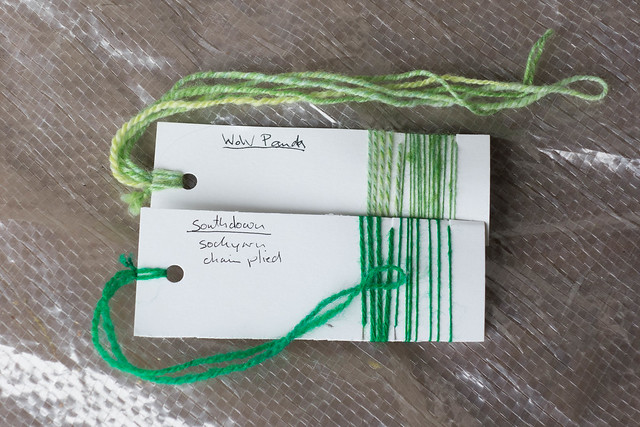
Sampling cards for two sock yarns.
Both are 3-ply, one traditional, one chain plied. The top one has a length of the 3-ply hanging from the loop, the bottom one a ply back

While I spin a certain yarn, I have the sample card on or near my wheel (I hang it from the tensioning knob). But I hold onto my sample cards even after finishing a project. That way, I can compare improvements in my spinning and can recreate a yarn if I want to. It is also nice to have a reference what the singles and unfinished yarn looked like when I have used the yarn in a knitted or woven project.

Sample Cards

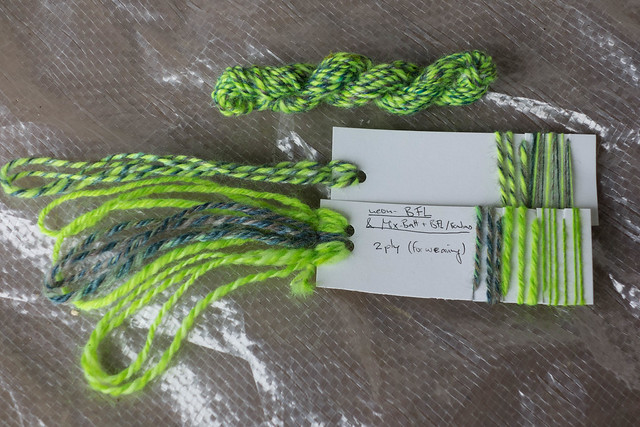
Initially, I wanted to make a 4-ply with the different colors plied together (top).
I tried separate 4-plies, but decided to use it for weaving and do 2-plies (strand at the bottom left).

It doesn’t take long to make a sample of your spinning and I like to look at my sample cards from time to time. I find their usefulness is well worth the few minutes it takes to make one!

Try it!

The wheels keep turning

The tour is in its last week and Froome wears the yellow jersey for the tenth stage.

I am more or less happily spinning the textured BFL/silk batts. In the hot weather, this has been a challenge and I was glad for the rest days. The second bobbin looks as the first one pictured in my last post and my progress is slow.The more I am spinning this preparation, the better I am getting in not fiddling as much with the singles. Instead of trying to draft out the slubs I started to rub the thicker spots to make the singles more uniform. This is similar to what Judith MacKenzie McCuin does at the plying stage of woolen yarn. I am eager to so how the finished yarn will look like and if this results in a somewhat even yarn.

When I haven’t feeling like sitting down in front of my wheel, I used my Russian spindle to spin up some angora that has been languishing for some time. I want it finished, so I can get to some angora/merino batts I bought in Backnang. The angora on the spindle right now is top that is a bit compacted. I don’t enjoy spinning it that much and have the feeling that my technique isn’t the best. I roll small fauxlags around one finger and spin with a long draw. The thickness of the singles varies a bit and I am not sure I insert the right amount of twist. However, it is a good practice for the batts.

Last year, I was spinning BFL/silk top, also using long draw (nobody would have guessed that’s my favorite draw) and I spun 400g of it. I am nowhere near that this year, which is in part due to the preparation and in part due to the time I spent at the wheel. Nonetheless, I am glad to have this challenge to remind me to sit down for at least a few minutes each day.

Tour de Fleece has started!

So, on Saturday, the cyclists started in Utrecht with individual time trials. I started spinning my batt from World of Wool. It consists of black and grey BFL and 25% Silk noils.

05. Juli 2015-3.jpg

BFL/Silk noils batt

I made a sample card, to remind me how thick I want to spin the yarn. As you can see, the singles has a lot of texture. I plan to make a 4-ply. This should make the diameter more even, but it will still have the white silk noils sprinkled all over it.

Sample Card

Sample Card

I spin with a long draw, letting twist between my hands. I can’t really draw smoothly back, since the batt is not uniform. My draw resembles more a point-of-twist approach, where I ‘feed’ the fiber slowly to the twist in the make. With this fiber, that is a rather slower process as a long-draw (both English or point-of-twist), since the fiber is almost resisting to being made into yarn. That’s entirely due to the mixture of BFL (a wool with a relatively long staple length) and the silk noils (very short staple length with nepps) and not to a poor preparation.

TdF day 1

The singles I spun on the weekend

I have been picking out the biggest slubs and small, thicker parts of silk. The singles still has a lot going on. I made a small sample of 4-ply and knitted a swatch. I don’t have a picture yet, but it looks promising.

Happy spinning,
Freya

Suck less

It turns out that blogging regularly isn’t something I am very good at. That doesn’t mean I want to abandon this space though. I have been knitting and spinning a bit in the last months. I was at a fibre festival in my area – the Backnanger Wollfest – and attended two workshops with Abby Franquemont. The Wollfest was wonderful and I met some lovely people, the workshops with Abby were full of information and quite fascinating. I wish I had remembered to take some photos and write a blog post right after it. I did take some notes during the “Getting more done with spindles” workshop and I have the sample of cabled yarn from the “Plying basics” workshop, so I might do a small blog post with that.

For the future, I plan to take part in the Tour de Fleece, a spin-along during the Tour de France (4. July – 26. July) organized in a group on ravelry. I will be part of the Team Suck Less, hosted by the “Friends of Abby’s Yarns” group and I want to suck less at spinning batts. My aim is to spin every day and use the BFL/silk noil batt I have from World of Wool on the wheel and two angora/merino batts from Seidenhase on my new supported spindles.

I enjoy spinning long draw, but have only used commercial top up until now. Spun from the fold or rolled up into fauxlags (hedgehogfibres has some good pictures how she makes them), I can make a nice yarn out of it. Nonetheless, I look forward to using a woolen preparation. I am keen on comparing the resulting yarns to the yarns I spun from a more worsted preparation.

I’d rather be swatching

Writing everyday is even harder than I imagined. Yesterday the day before yesterday, I had to write a text for work and just couldn’t face writing something for the blog before I went to bed. Also, allowing myself to delay a post only worsens the problem. As if one post per day wasn’t enough! Anyway, one post for today is the least I should give you.

Instead of writing a post, I have been watching Mary Jane Mucklesone’s Craftsy class “the Fair Isle Vest”. She talks about Fair Isl knitting in general, for example: chosing the right yarn, how to arrange the colours, how to read charts, different methods to swatch and so on. Furthermore, the class is arranged around a vest design of MJM. This means that she takes you through each step of a fair isle garment and you can watch her doing all the steps before doing them yourself.

Swatch in natural and green handspun

Swatching in the round

While I like this class (as well as others that I have taken on Craftsy), I am not sure how much I like the concept of the Craftsy classes. On the one hand, it is a nice, hands-on approach where one can directly see how the teachers do the techniques. The videos can be rewatched (as long as one has an internet connection) and paused when ever needed. However, I feel that the classes have only a short amount of time committed really specialised information. To begin, a topic is covered broadly, but I usually don’t find that much that is entirely new to me. It might be because of my love of knowledge that drives me to read all those lovely blog posts of accomplished knitters (e.g. Kate Davies’ on steeks) that go into detail of what they are doing. Furthermore, I sometimes feel the shots of the techniques could be improved. While there is a camera focusing on the hands when the teacher shows something, the cuts to that camera are often after the teacher has already begun explaining. I am not sure why this is handled like this, but more than once, I called “show me what s/he’s doing” a my monitor. It is frustrating if a highly visual medium isn’t used to its fullest advantage.
Even though I have some criticism on the general format, I do enjoy the Craftsy classes. On the contrary, inspired by MJM, I started swatching Fair Isle patterns out of my handspun.

Fall is here (and Winter is coming)

Forest in the fall

By U.S. Department of Agriculture (Hapgood Pond) [CC-BY-2.0], via Wikimedia Commons

When giving me this challenge to write a post for each day in November, I hadn’t realised how much nicer a post with pictures looks and how helpful an illustrative picture can be, but now it is getting dark so early that getting those pictures is not so easy.

Of course, it is not only getting dark sooner because we turned the clock last week, but also because the northern hemisphere is directed away from the sun due to the axial tilt. This leads to the days getting shorter and the light is less intense. This is commonly known as “fall” (or autumn).

Diagram of the Earths seasons

The seasons depend on the axis tilt of the earth with respect to the sun. Beginning with the front left, depicted are (with respect to the northern hemisphere) anti-clockwise: autumn equinox, winter solstice, spring equinox, summer solstice.
By Tauʻolunga (Own work) [CC0], via Wikimedia Commons

From summer solstice (June, 21) to winter solstice (December, 21), the northern hemisphere gets progressively less sunlight every day. At the autumn equinox (September, 23), the periods of daylight and night are equal. This marks the beginning of autumn.

While this means the leaves are turning lovely shades of yellow, orange and brown, it also means Christmas is nearer than I want to acknowledge. Each year, at the end of summer I am proud to think about gifts early, and then I forget about them until it is November. Now, I do not tend to knit for Christmas, but thinking of gifts the recipient will love is hard for me. I like the build up to Christmas while I dread it at the same time; there are so many things to do and the time seems to fly. The short time of daylight seems to emphasise this, while it also encourages you to light a candle and knit with a cup of tea next to you.

Cardigans need buttons

The thing about cardigans is that even when all the knitting and sewing in is done, they need buttons. I knitted most of Laar two years ago. I had already bought the buttons but wasn’t sure if I should add a ribbon as stabilisation of the button band.

Laar in lilac with small white buttons

Laar – finally with buttons

In the end, I decided to go for it. I like the result and it gives the button band enough strength to hold the buttons. The stitches seemed small at the time, but they are quite visible if you look closely.

button band from the inside - ribbon visible

I like the inside as well

For Cria, it didn’t take as long to find the buttons, and I have sewn the ribbon down and started with the buttons.

Brown Cria with three green coconut buttons sewn in

Cria with the first three buttons sewn on

The ribbon matches the colour of the yarn almost perfectly and I think my future cardigans will get a ribbon at the button band as well.

Cria has a brown ribbon with brown shell buttons as backing buttons

Inside of Cria

Now I just have to sew in 16 more buttons and Cria is ready to wear!

Counting

Today, I spent a long time counting. To measure the yardage of a skein, you need to count the number of times you wound the yarn around your winding tool. To get the yardage of three skeins, I counted through several “Gilmore Girls” episodes. I have one more skein of about 400 m, so that should be enough to knit a sweater.

BFL Silk natural

Before spinning this BFL/silk blend, I dyed 100 g in greens and blues. This is meant to be the contrast colour for a fair-isle yoke. I spun all of the fibre with a long draw from fauxlags to get a light, airy 2-ply.

BFL Silk dyed

I look forward to swatching since I want to try a few different fair-isle patterns to be able to decide what works best with my yarn. I like the Freyja Sweater but will probably use a pattern that stands out more when using only two colours.

November rules

Wurmlinger Kapelle

Sight from my bike ride today

I don’t want this to be complicated for myself; I guess that one post per day will be hard enough for me. So, I will keep the rules simple:

– Each post should contain at least 100 words.

– While I want to post daily, I will allow a  window for each post (save the last post). That means that I can post a day early or late for each day, as long as the posts are still posted in november.

– There should be a topic for each post. This topic can be broad and can be anything that I want to write about, but I have to tie it together somehow

– Photos can be added without matching the topic 🙂